For a lot of 2013 Nexus 7 owners, DSLR Controller works correctly out of the box. There is however an issue specific to this device which may prevent the app from working. While it is not yet exactly clear what the cause is, or why the steps in this guide can fix the problem, several users have fixed their (USB) connection issues following these instructions. This is not an issue with DSLR Controller - this is an issue with the 2013 Nexus 7.
While none of the operations you are asked to perform are dangerous, you will lose all data on the device. So make sure you have backed up your pictures and other media and documents before continuing. At a certain stage (this is clearly marked in the guide) you will also void your warranty, but you may already have DSLR Controller working before you reach that point. Interestingly enough, for different users, it starts working at a different point in this guide. Let's just hope Google find the issue and properly fixes it in future firmwares. Note that at the time of writing, the latest firmware revision is JSS15Q.
If you are used to tinkering with your device, are familiar with OEM unlocking and flashing stock and custom firmwares on your Nexus, all the steps should be familiar to you.
Please make sure your tablet's battery is fully charged before continuing.
1. Making sure you're suffering from this problem, and not from a faulty cable
As first step, open the Play Store and install the (free) USB Host Diagnostics app. Disconnect any USB cables, run the newly installed app, press the Start diagnostics button, and follow the on-screen instructions.
If anywhere during these diagnostics, you got a popup asking you to start DSLR Controller, you are not experiencing the issue this guide is written for, and the app should really just work.
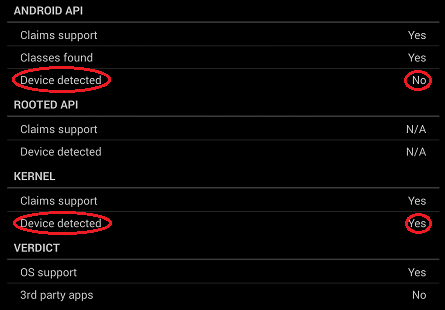
Now the diagnostics are complete, scroll to the bottom of app's screen, and you should see a list of results. If Android API: Device detected is No and Kernel: Device detected is Yes, you are likely experiencing the issue this guide describes. If both are No, there's also the chance you are having a cable problem, though following this guide may still help.
2. Change language
Strangely enough, several users have reported changing the language fixes the problem for them. Go to Settings -> Language & input -> Language, change the setting to English (United States), and reboot your device. Try DSLR Controller again and see if it works now.
3. Factory reset
The next thing we are going to try is simply doing a factory reset. This will wipe all your data! Go to Settings -> Backup & reset -> Factory data reset and press the Reset tablet button, followed by the Erase everything button on the next screen.
Your tablet will now reboot, and you may seen a little green Android on screen for a minute or two, after which the tablet will reboot again.
Once booted up again (and this will take up to 10 minutes), you will be presented with the Android setup wizard. Make sure (and this is important) you select English (United States) as language.
Follow the wizard's instructions, configure Wi-Fi, login to your Google account, etc. Now install DSLR Controller again, and see if it works. If not, try USB Host Diagnostics again to confirm the problem remains the same. If it does work, you're done, you can close this page.
4. Installing the tools needed for the following steps
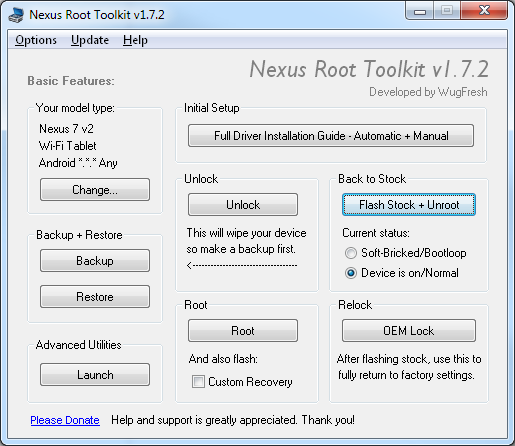
For the next few steps we need a Windows computer, and some special software, namely WugFresh' Nexus Root Toolkit. Please download and install from the page just linked. If you open the downloaded file (at the time of writing: NRT_v1.7.2.sfx.exe), it will ask you where it should install itself, and after installation it will start automatically.
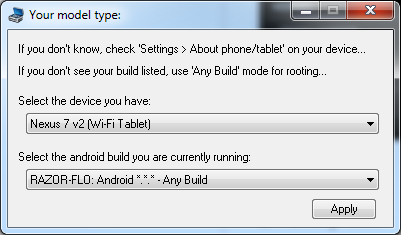
At startup, first it will ask you the type of device you have. The 2013 Nexus 7 is called the Nexus 7 v2 in this software. Please select Wi-Fi or Mobile (LTE) version accordingly. It also wants to know which Android build you have, select the one ending in Any Build here. Press the Apply button to continue.
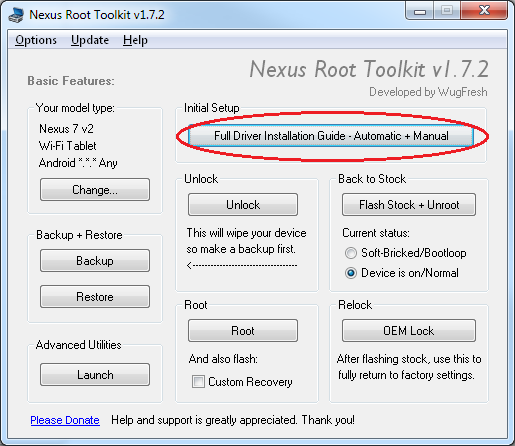
Following, it may ask you to download some files. Just press OK here and wait for the downloads to complete. Now you will be presented with the main Nexus Root Toolkit screen. The first thing we want to do here is FullDriver Installation Guide - Automatic + Manual.
Before following the complete driver install guide, first put your Android device in USB debugging mode. This is done by going to Settings -> About Tablet and tapping Build number 7 times, pressing back, going to Developer options and making sure the USB debugging option is ticked, and connect your tablet to your computer using a USB cable.
Now, on your computer, on the Step 3 tab, press the Full Driver test button. This might take a few minutes, but if it tells you all has been successfull, you can skip the driver installation step. If the test was not successful, go to the Step 1 tab, and follow the on-screen instructions.
If you have to go through the full driver installation steps, this will keep you busy a while. But the good news is, in the future (even with different Android devices) you will likely not have to go through it again.
5. OEM unlock (bootloader unlock)
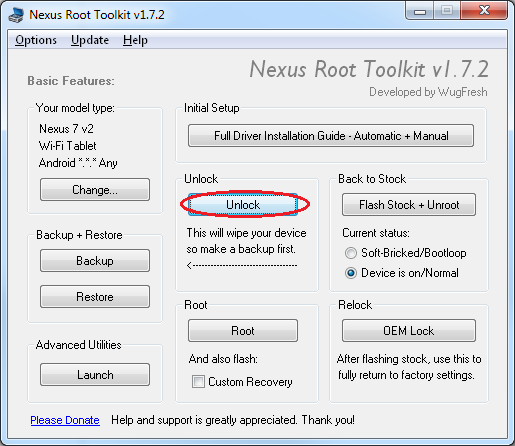
This next step will officially void your warranty, and again wipe your data. Make sure your Android device is fully booted up and connected to your computer, and then on the main screen of the Nexus Root Toolkit, press the Unlock button, and follow the instructions presented to you.
Once again, follow all the steps in the device setup wizard at first boot, but make sure to select English (United States) as language. Follow the instructions on your computer to re-enable USB debugging, but do not move on to Root your device.
When you're done, install DSLR Controller again, and see if it works. If not, try USB Host Diagnostics again to confirm the problem remains the same. If it does work, you're done, you can close this page (and the toolkit).
6. Re-flashing the latest stock (original) firmware
This next step will completely re-install your tablet with the latest firmware version from Google. Make sure your tablet is booted up and running again, USB debugging is enabled, and it is connected to your computer. Next, press the Flash Stock + Unroot button.
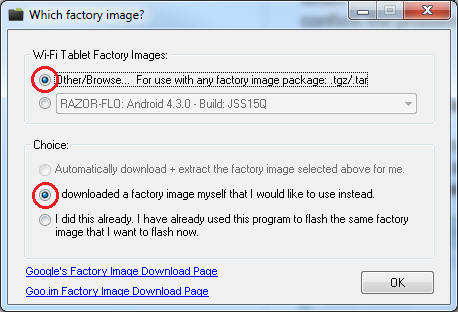
In the next screen, select the Android version to flash. The newest version will be at the bottom of the selectable list, and at the time of writing is JSS15Q. Set the option to automatically download, and press OK to continue.
The download will take a while, and when done you will be asked to confirm before the firmware is flashed to your tablet. Once more, follow all the steps in the device setup wizard at first boot, but make sure to select English (United States) as language.
When you're done, install DSLR Controller again, and see if it works. If not, try USB Host Diagnostics again to confirm the problem remains the same. If it does work, you're done, you can close this page (and the toolkit).
7. Flashing AOSP firmware
If DSLR Controller is still not working, the next step is to flash the AOSP firmware. This is almost the same as Google 's latest firmware, but built from Google 's publicised sources. Booting it up has been known to solve this USB issue for some users.
Download the AOSP firmware here: razor-aosp.tgz. Make sure that you are saving this file, and not opening or extracting it.
When the download is complete, again we use the Flash Stock + Unroot button in the toolkit. This time, select the Other/Browse... and I download a factory image myself (...) options, and press OK to select the file you just downloaded. At one point you will be asked to enter an MD5 hash as well, copy/paste the following code: af2e3c857931c7958813df09b9bcd739
Follow the (now familiar) instructions to flash this firmware. After flashing, the toolkit on your computer will ask to Update Model Type. Just press Cancel here.
The tablet, once booted up, will not present you with any wizard, nor is there any Play Store installed to install DSLR Controller. Just connect your camera to the tablet and turn on the camera (or press the shutter button if it was already on). If all is well, the gallery application should automatically start and show you the images currently on your camera.
If that didn't, we're fresh out of ideas here. If it did work, great - USB should now be working correctly. Either way, this firmware is not really usable, so we need to flash back to the latest official firmware. So scroll back up and follow the instructions at 6. Re-flashing the latest stock (original) firmware again.
Conclusion
Hopefully you have DSLR Controller operational by now. If not, we truly are sorry for wasting your time. However, the steps in this guide have made the 2013 Nexus 7 suddenly work for a number of users. Again, we would like to point out that this whole thing is an issue with Nexus device, not with the DSLR Controller app. And once you have the Nexus working, it is one of the best devices available to use DSLR Controller with!